Another Developer Blog
How to Publish Your New Blog
November 09, 2024
You’ve got it all set and ready to go, now you want to get it out there and let the world read your blog. I’m going to go over how to get your creation running in an Azure Web App. There are many options for hosting services for .Net 8, in this post I’ll go over setting up and using Azure Web App with Azure SQL Database.
Oqtane is built on Blazor, which is also an application framework. Blazor is built to work as a server serving content like the traditional web page or it can be a complete client application, it can also be a hybrid of both. Oqtane then adds to the Blazor framework most tools and functionality any app needs to have, users, roles, content, logs, jobs, etc... For this scenario, we will be using Oqtane like a traditional web server serving out pages. That means we are using a "Static" rendering mode with a "Server" connected with SignalR.
Here are the steps we will go through to publish our new blog:
- Setup Azure Account
- Create a Subscription
- Set up the App Service & Database
- Deploy Oqtane
- Deploy Database
- Copy Files
Step 1 - Setup Azure Account
If you don’t have an Azure account yet, this is the time to create one. Simply go to the Azure Portal and sign in with your Microsoft account. If you don’t have a Microsoft account, you can also create one at this time. Once complete you should see the welcome page:

There is a page that will ask what you are going to be using Azure for. This helps with the tour tutorials it will choose to show you once your account is created. If you don’t know what to select, you can check "Develop and deploy scalable cloud native applications" as probably the closest to what we will be setting up.
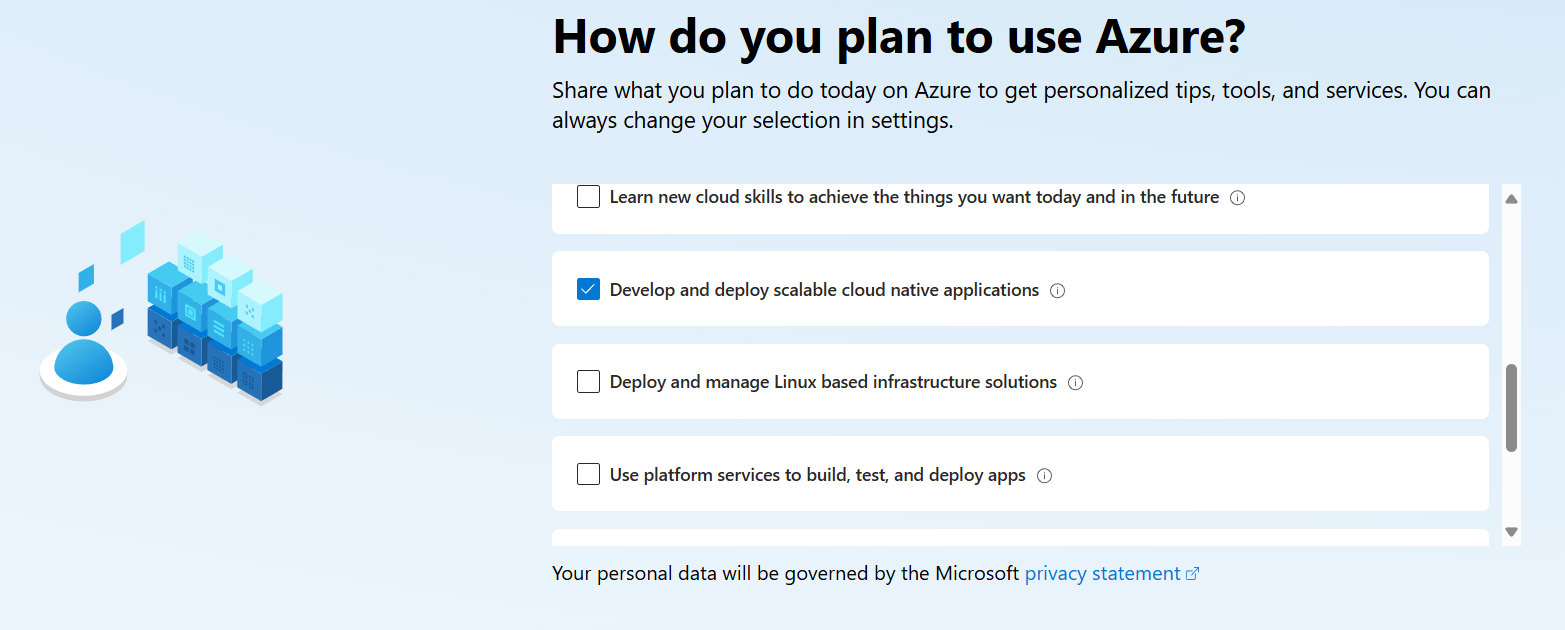
After this question, you will be offered a tour of Azure and a list of tutorials. Feel free to browse around and get some quick insight into Azure.
Step 2 - Create Subscription
You will need to create a subscription to run an Oqtane instance within Microsoft Azure. There are costs associated with this set up, so if you are playing around and would like to see what Azure can do for you or would just like to get to know it better, I would recommend the Free Account offered on the dashboard that gives you up to $200 of credit to use for the first 30 days and can cancel the account with no obligations. The Pay-As-You-Go option is good if you are already familiar with Azure, and you are ready to rock this. Create the subscription that is right for you. If you are unsure, please use the help feature within Azure to answer your subscription questions.
NOTE: The steps I’ll go through to publish will keep the hosting costs low (under $14/month USD) . At the time of writing this post, Azure is free for the first month if this is your first time using its services for the resources I’m going to use to make this work.
Step 3 - Set up the App Service & Database
We have our subscription ready and can now set up the app service and database to host our blog. Azure has the perfect set up routine for us to use. It’s called Web App + Database.
To begin, we need to create the new resources. Click the Create button in the upper left when you are on the home page of your Azure portal: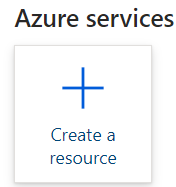
In the search box, start to type "web app" and it should auto complete to "web app + database". Select it to view the product information:
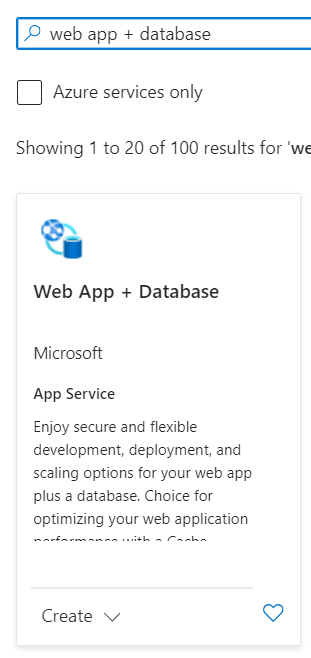
On the product information page, click the little "Create" button on the first page:
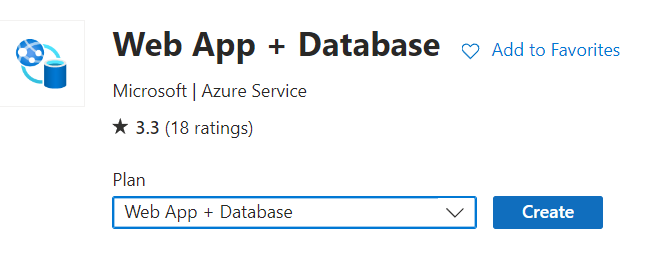
The Subscription you just created should be the chosen subscription for your new blog. You’ll want to create a new resource group. Click the Create New link under the Resource Group drop down and enter "Blog" for the group name (or whatever you wish to call it, this is all your stuff).
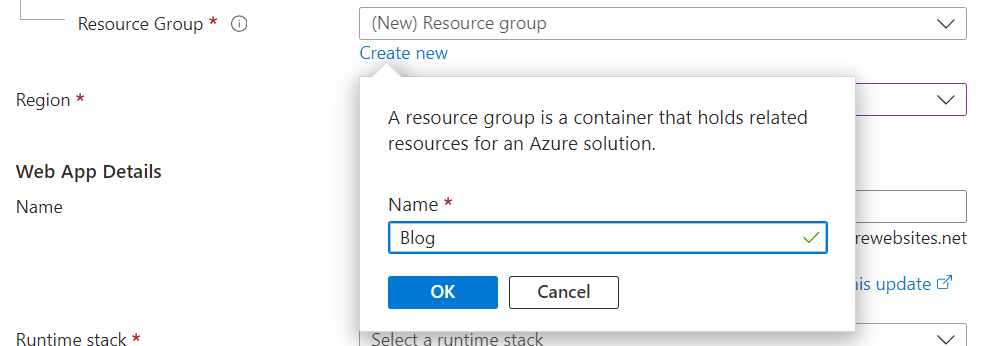
For the region I picked one close to me. This is pretty normal for most individuals and organizations. Apps tend to work better when severed in the area/language they are closest to. Give your blog app a name, and select your runtime stack of .Net 8 (LTS)
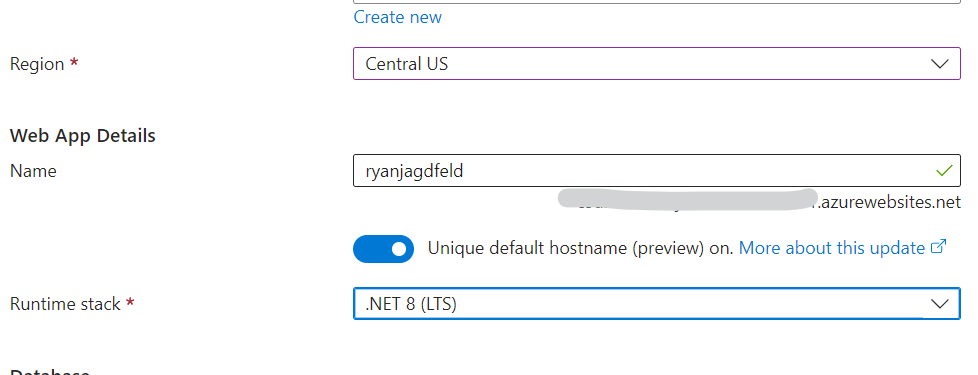
NOTE: not all regions use the .Net 8 runtime stack, so if you can’t select the .Net 8 (LTS) from the runtime drop down, or receive an error on the review page, please try another region.
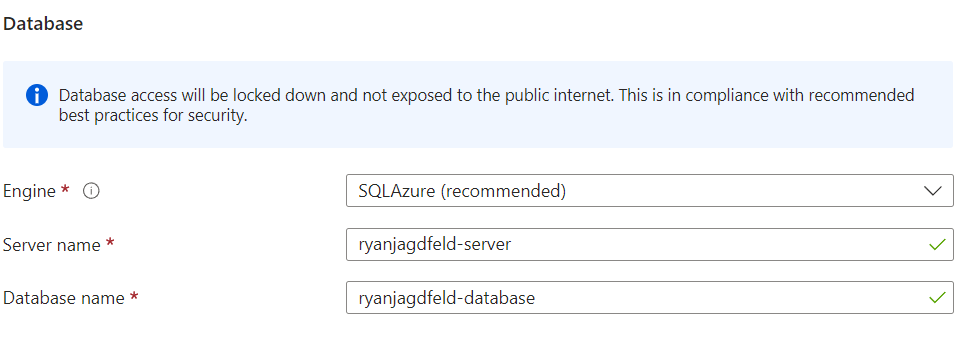
For the Database, the defaults should suffice. It will default with AzureSQL and the names of the server and database using the name you gave your application:
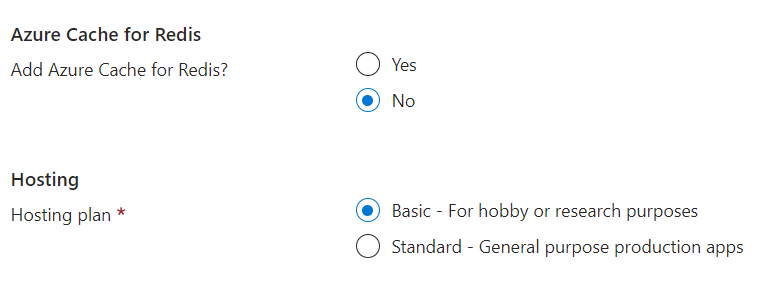
In the next section, I don’t believe we are going to need caching right away for this new blog, so let’s select no for that one.
And finally, select "Basic" for this app’s Hosting. This will give us a low costing app service and database.
Click "Next: Tags" button at the bottom of the page. You can enter any tags here you wish. I’m not going to go into any details about using tags within Azure, but they can be quite useful if you plan to have lots of resources.
Click Next: Preview and Create at the bottom of the page and you will now see a summary of what is going to be created.
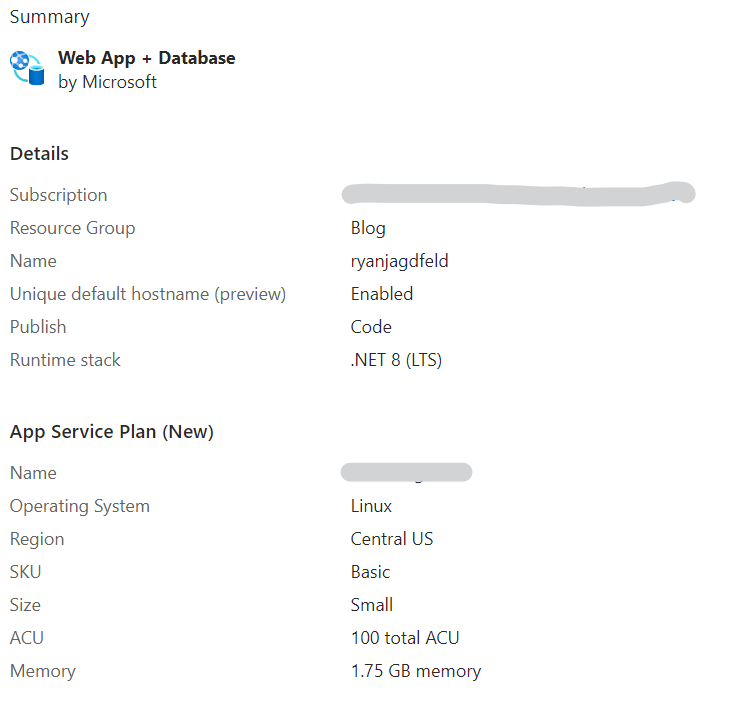
and under that, there is more information about the server names and such.
Click the "Create" button once you are ready to deploy your web application and database. After you click "Create" you will be taken to a deployment page. Wait a bit and the deployment will complete with a message at the top:

Click the Go to Resource button and you will now be on the main page for your Azure Web App
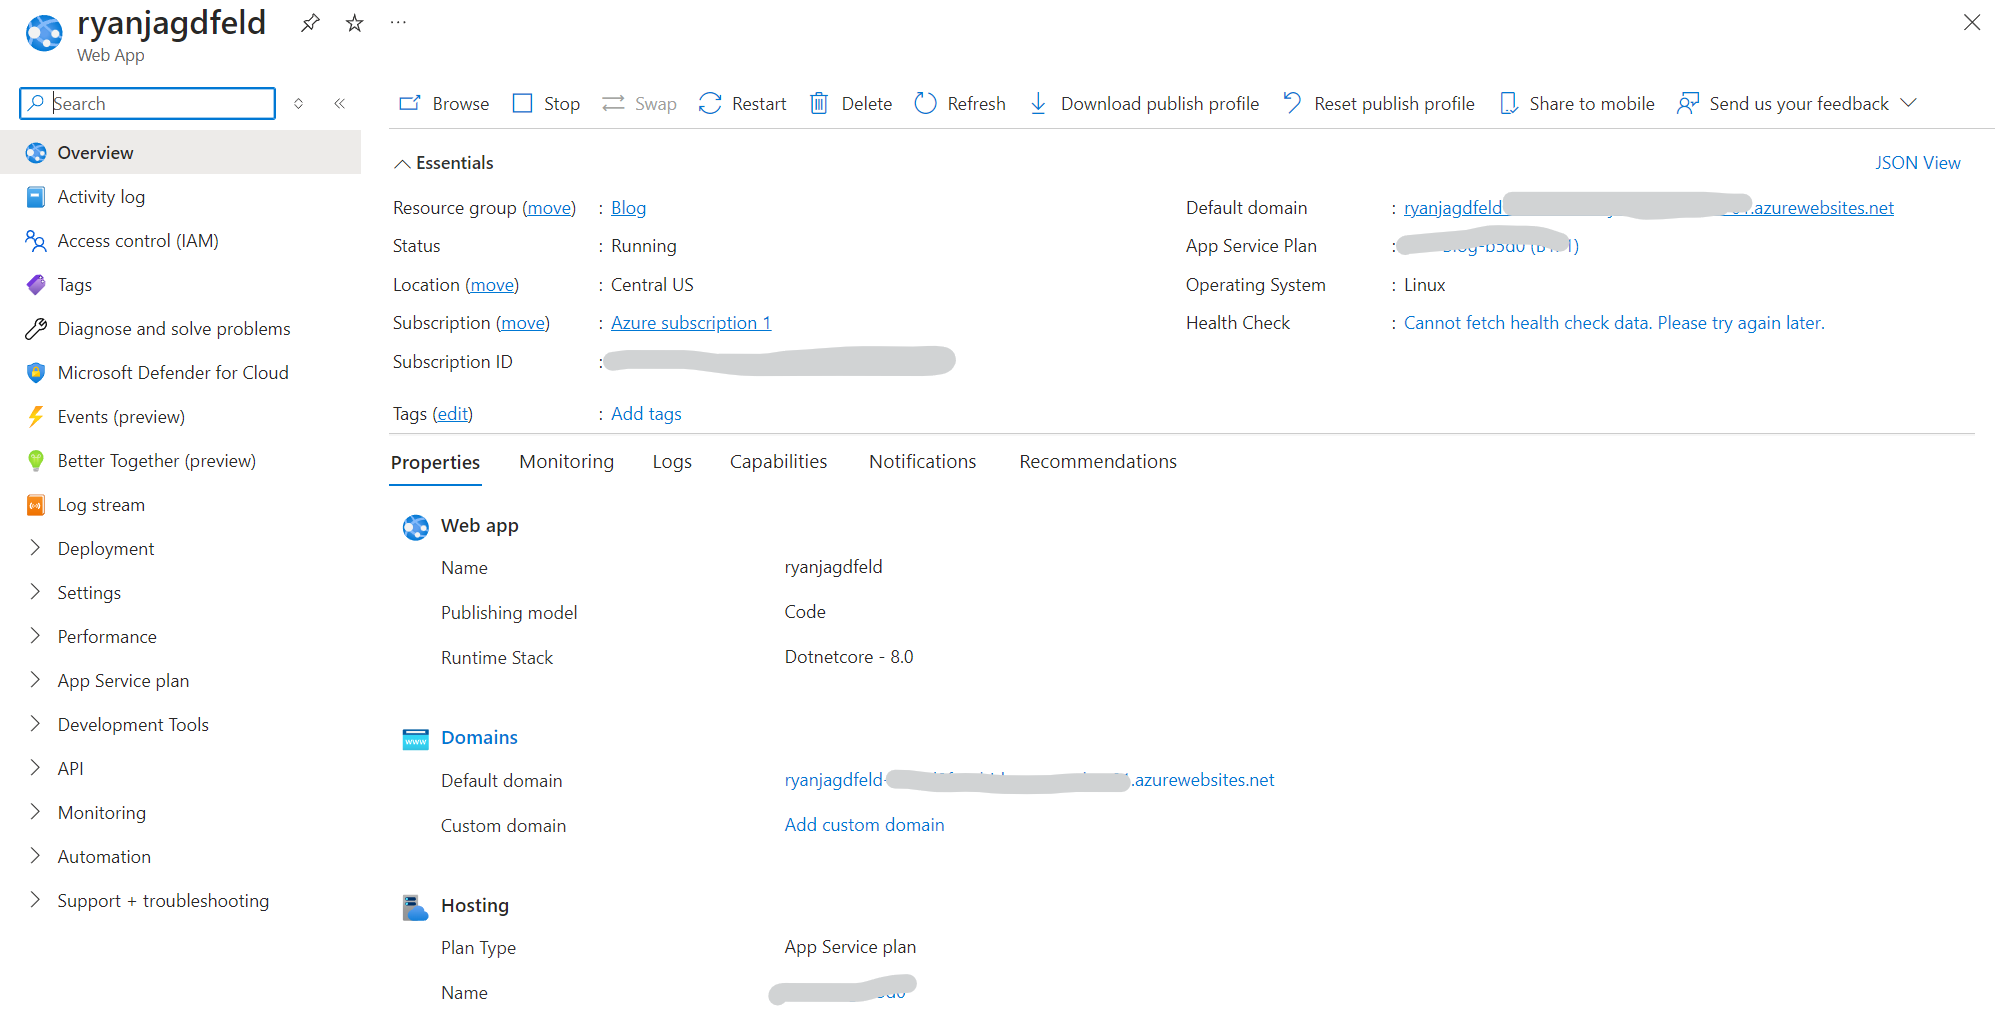 There is a lot going on here. I won’t be able to go over much in this post, but there is wonderful documentation within the Azure portal to help with understanding all of the settings inside an Azure Web App. The basic hosting we selected in the initial deployment of our web app made most of these default settings work right out of the box for running Oqtane within an Azure Web App service.
We are going to go ahead and delete the database they initially setup for us. The Gen 5 serverless database can work here, however, we are going to import our local database. So, let’s delete this one and deploy ours from our local machine into a flat rate Azure SQL Database. Click on the Blog resource group from the dashboard. Click on the database name in the list of resources

Then click Delete at the top

You will be asked to confirm, type the database name into the provided box and click delete. After a moment or two you will see a message in the notification area that the database has been deleted.
Step 4 - Deploy Oqtane
We are going to deploy a fresh copy of Oqtane to the new Web App. First download the latest install zip file from Oqtane’s GitHub page. Make sure it’s the exact same version of your local copy. Next, in your Azure portal, open the new Web App. On the Web App overview, click on the "Download Publish Profile" from the top menu options:

This will download an XML file with everything you need to log in to your new Web App. Open the file in your favorite XML reader and find the settings for the FTP connection.

Using your favorite FTP application, connect to the web app using the settings.
I personally use Filezilla for all my FTP’ing. I would recommend checking it out if you don’t have a favorite FTP client application.
If you used the full path in the publish profile as the host, once connected you should be in the /site/wwwroot folder, if not, browse to it. Extract the files from the Oqtane install zip into a directory on your PC and upload them to the wwwroot folder.
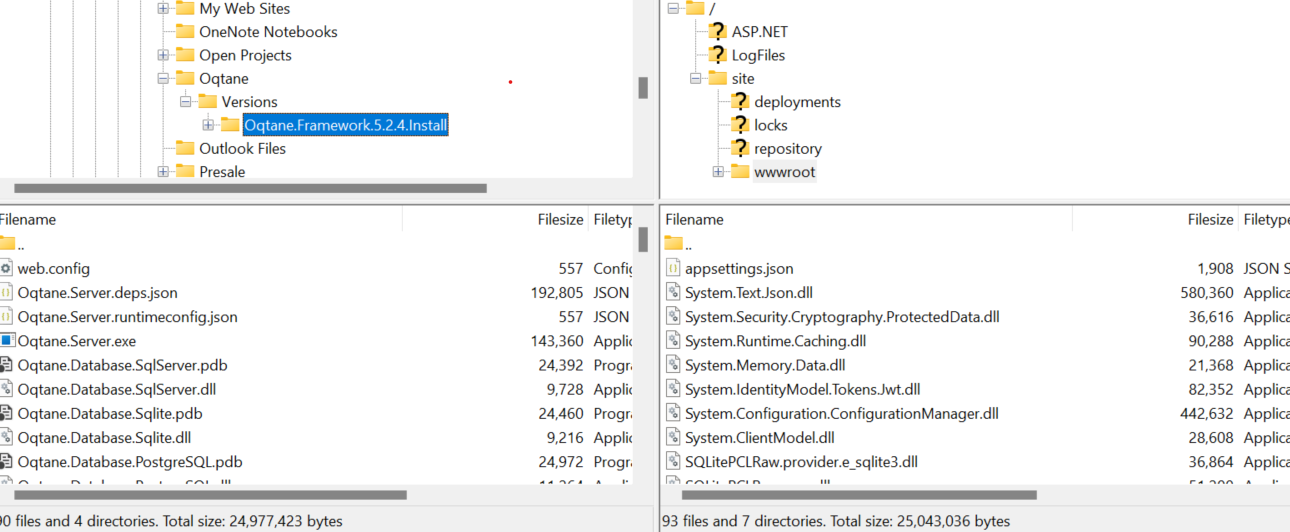
If you haven’t set up your blog locally yet, follow along from my first post "How I Made This Blog".
Step 5 - Deploy the Database
Our next step is to copy the database to our new published instance of Oqtane. Click on the Blog resource group from the dashboard

Before we start, we need to tell our new database server that our local IP address needs access. In the Blog resource group click on the database server to open it. Click on Security on the left and then open the Networking blade
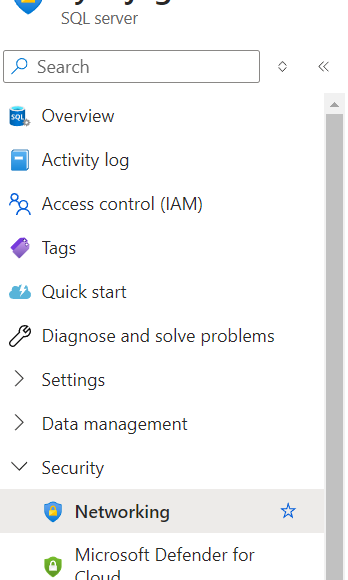
On the right you will see a link to add your network's outside IP address to give your local PC access to the server.
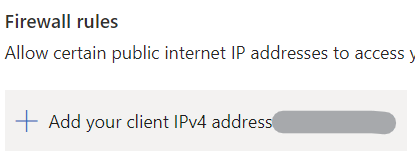
Click it and it will fill in the form with your IP address in the start and end

Click Save at the bottom.
My latest run through this process to make sure I’m describing it correctly to you, I ran into a strange issue were it auto filled the boxes with my IPv6 IP address, rather then my IPv4. I simply had to type my IPv4 address into the boxes manually.
Open SQL Server Management Studio on your PC.
If you don’t have SSMS installed yet, you can download it for free here: Download SQL Server Management Studio (SSMS)
Once open we connect to our LocalDB
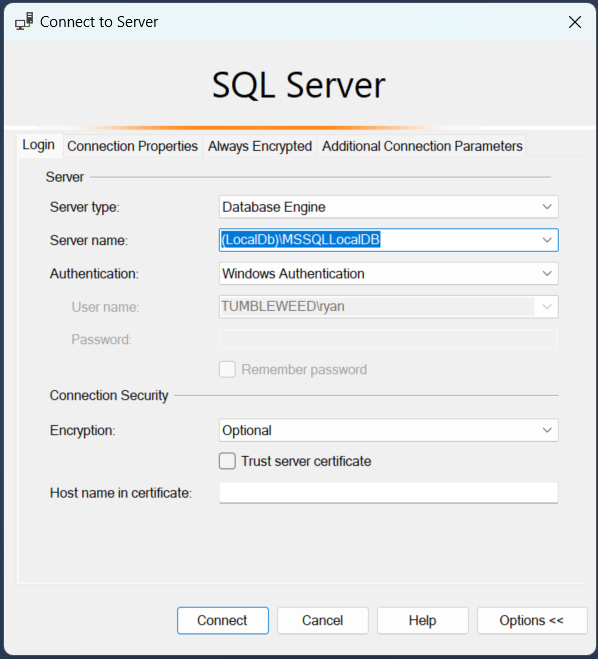
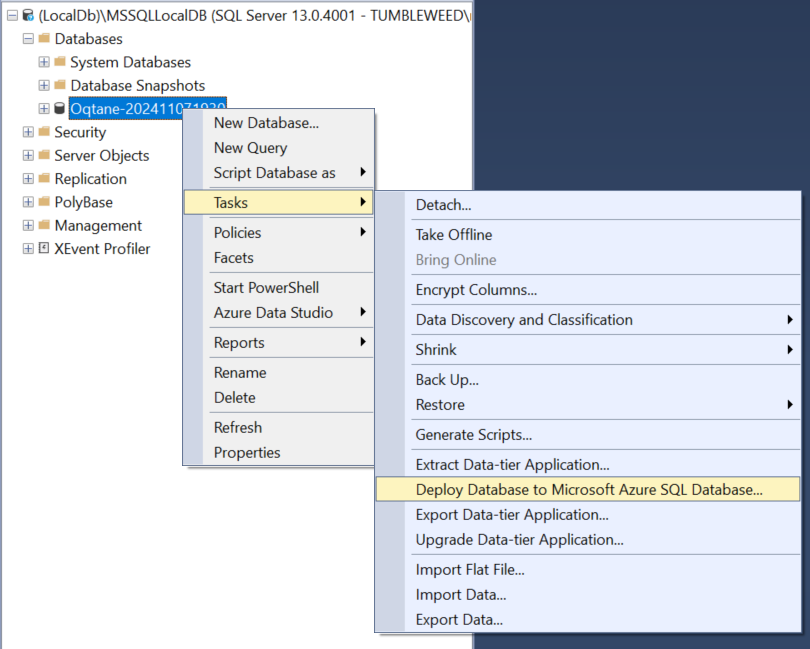
If LocalDB is not an option in your dropdown, simply type "(LocalDB)\MSSQLLocalDB" into the box provided and it will connect you to the LocalDB server. On the left you will see your database for your Oqtane instance you created locally. Right click on it and select Tasks, then select "Deploy Database to Microsoft Azure SQL Database..."
The next screen will ask you where you are deploying to.
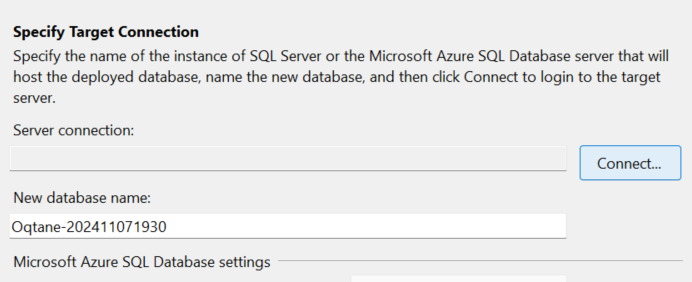
Click on the "Connect" button and the connection screen just like the one when you first opened SSMS will appear. Enter your server name, choose SQL Server as the authentication and enter the admin user name and password. If you are not sure, you can find them in the publish profile XML document we downloaded at the beginning. It will be in the SQLServerDBConnectionString setting.
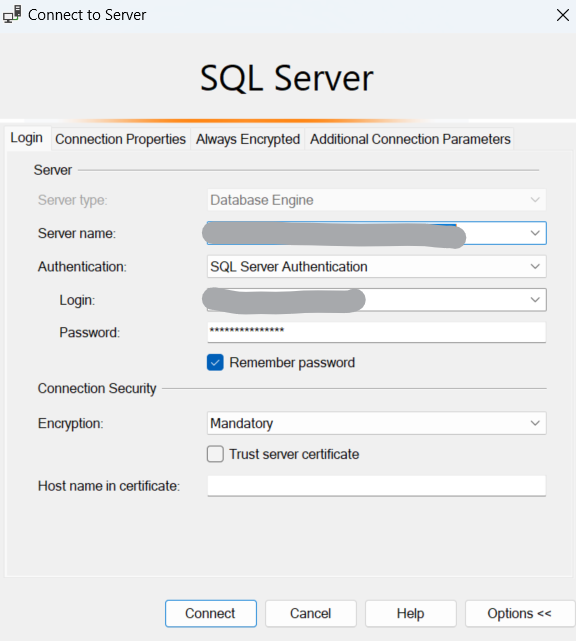
Click connect at the bottom and you will be back at the first screen. Enter your database name exactly as the one that you deleted. Choose "Basic" for the Edition of Microsoft Azure SQL Database and you can leave the rest of the default settings.
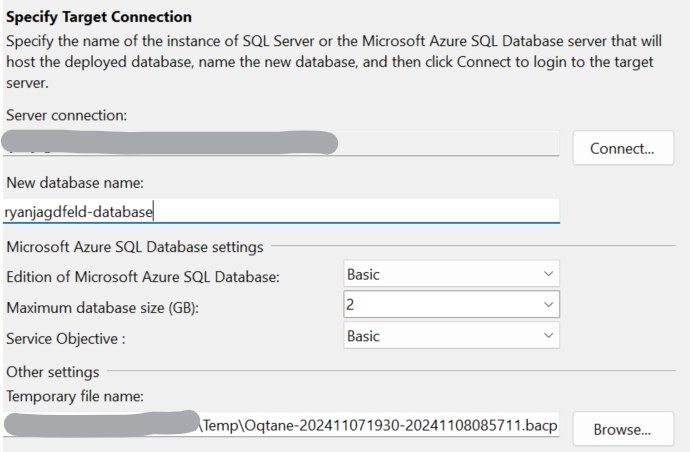
Click Next and you will see a summary of the operation that is about to be preformed. Click on Finish and the process will start to deploy the database. It will take a couple minutes to complete.
When the process is complete, close the window by clicking on Finish and you will be back at the SSMS application. Click the little icon of a plug at the top of the Object Explorer.

This will open the connection screen again. Now that we’ve connected to our Azure database to deploy, it should be a choice for you to connect with again in the dropdown. Select it and click connect. We need to make a slight change to the Alias record so that we can bring the site up at it’s new location. Expand Databases in the Object Explorer under your new connection to the Azure SQL Database Server, then expand the database itself, then Tables. Find the Alias table, right click on it and select "Edit Top 200 Rows" from the menu
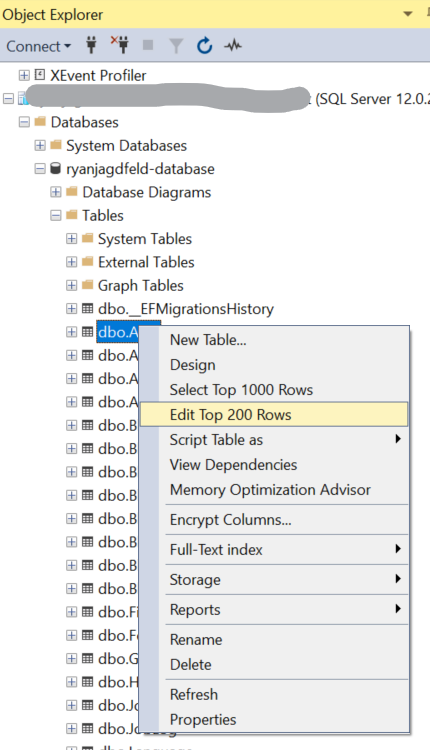
Copy your new blogs URL from either the Overview page of the Web App in Azure or from the publish profile XML file you downloaded earlier and paste it in the Name field. Remove the http:// so that it has only the alias in the field value.

Press the Enter key to save the record and then close the query window.
Next, we need to tell our application where the database is located. Open the Web App in your Azure portal and on the left, expand Settings and click on Environment Variables. At the top click on Connection Strings
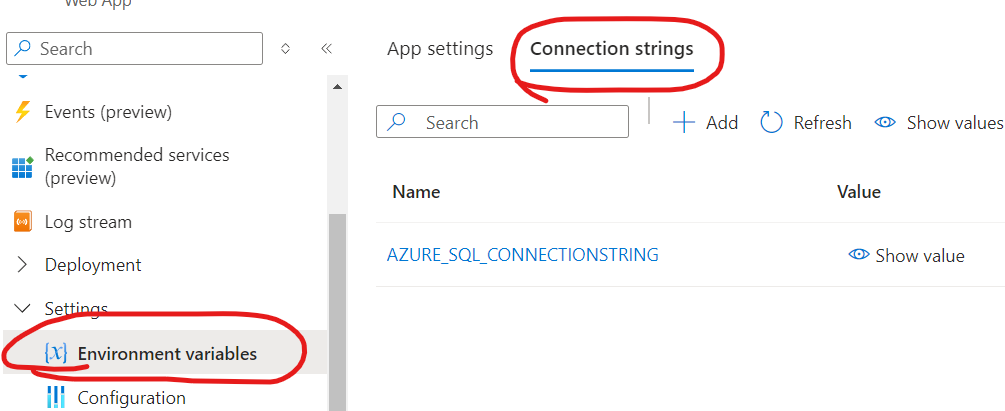
Click on the existing connection string "AZURE_SQL_CONNECTIONSTRING" to open it. Click the copy option to the right of the box with the string value:

Click the close X in the upper right, then click the Add button to add a new Connection String.

Name the connection string "DefaultConnection" and paste the value of the other connection string into the value box. Select Azure SQL from the Type dropdown and then click Apply
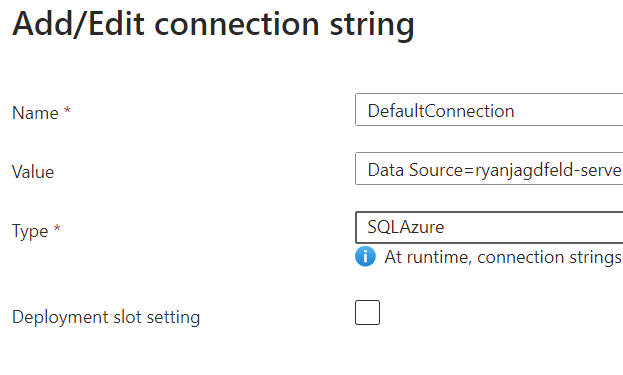
Click Apply on the next screen and you will be told you are about to restart the application.

Click confirm and the application will restart, however, don’t browse to it just yet. Follow step 6 to copy your images and files to the new hosted service.
Step 6 - Copy Files
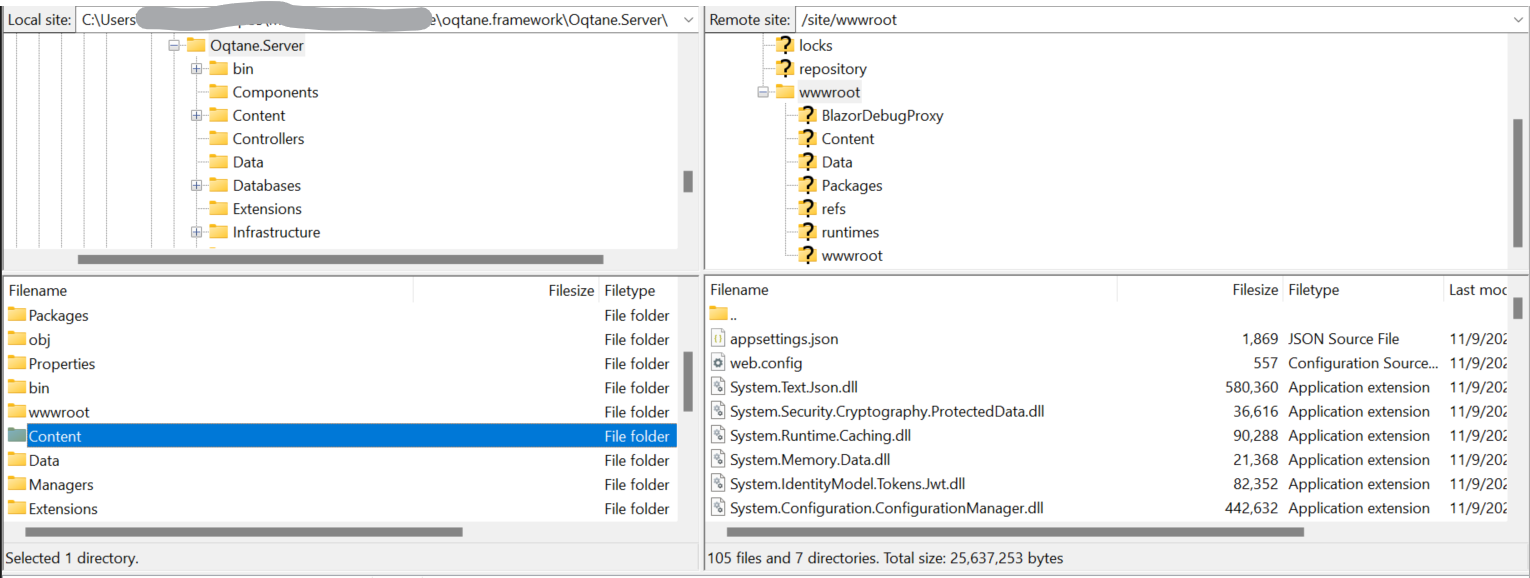
The last step we need to perform is to copy all of the images we used for our site and blog to the file system. There are two locations of files we need to upload. The root folder is physically located in a different location from all of the other files. Let’s copy the root files first. Open your FTP client application and connect to your Azure Web App service again like we did when we deployed Oqtane. Open the site/wwwroot folder in your Azure Web App directory. Browse to the oqtane.framework/Oqtane.Server directory on your local device and right click on the Content folder and select upload. You will be asked if you want to overwrite the logo-white.png file, you can skip it, its the exact same file.
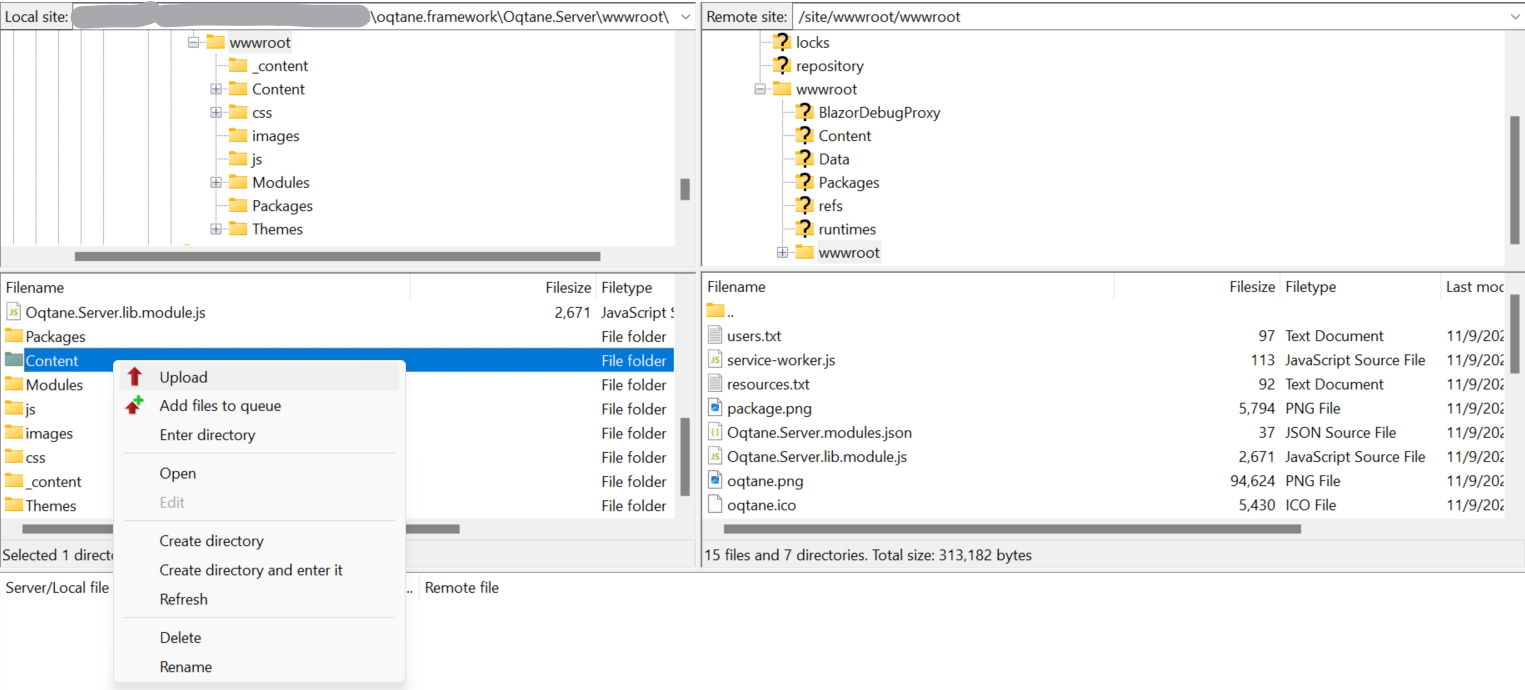
Next we need to copy the site content directory. In your Web App directory browse to site/wwwroot/wwwroot. On your local, open oqtane.framework/Oqtane.Server/wwwroot and again right click on the Content directory and upload it:
You’re almost done, we just need a restart to the Web App and the site will be published. Go to the Azure portal, open your Web App and click on the Restart button at the top of the page:

You will get a notification in the upper right once the service has restarted.
Go back to the Overview (top option on the left menu() and click on the link under the default domain near the top right:

This will open and install your new instance of Oqtane. Give it a moment, we didn’t give this instance that much computing power, so it can take a couple of minutes before your blog appears.
You may receive a timeout error at this point. Don’t panic, we are simply asking a basic service to do quite a bit of work. Click your browsers reload button and try again. Once this initial install of Oqtane happens, your application won’t have slow load times like this for anything else.
When your blog loads, you will notice that there are just titles of modules and the original Oqtane theme displays instead of ours. If you login, you will see errors where your modules should appear:

That’s because we need to install those items so the system can find the correct files to work with. At this time, go ahead and install your Theme in the Theme Management page and then install the Oqtane Blog module in the Modules Management page like we did when we first setup our Oqtane instance. If you used any other modules in your local copy, you’ll need to install them now as well.
Once installed, restart the application again using either the same method we just did or inside the app from the Application Information page and ta da! Your blog is now published!
Conclusion
I hope you are enjoying Oqtane and creating this blog as much as I am! We've gone through quite a few steps to get our app/website published. The monthly cost of running the setup I just walked through is low. It should stay under $14/month USD. Microsoft Azure is just one type of .Net application host available. The beauty of Oqtane built on Blazor, and all of .Net for that matter, is that it can run on most operating systems. Your new instance is running on Linux instead of Windows. There are ways to host .Net applications on AWS as well as home made servers. Please leave a comment and let me know of some of your adventures in the .Net application space.
Share Your Feedback...
Receive Blog Notifications...
© 2024 Ryan Jagdfeld All rights reserved.