Another Developer Blog
Finishing Touches
November 26, 2024
Your instance of Oqtane is now out there on the internet serving your blog, but who can find it? How do we tell the internet about our blog? How do we secure it? How do we make it our own? In this post I’m going to walk through the finishing touches of publishing a new Oqtane Blog to the internet. This will include adding your own domain name, securing the site with an SSL certificate from Microsoft Azure and adding META data so the internet search engines knows what our blog is about and when to be relevant to user’s searches. Plus, we’ll add in Google Analytics for tracking your users and get more detailed information about how well your posts are doing.
Adding Your Own Domain Name
First thing we want to do is brand our new blog to something that is ours, something that is meaningful to the blog and the internet by giving it a domain name of our own. As you can see, I purchased my name as my domain name for this blog ryanjagdfeld.com. You can choose any domain name you wish as long as it’s available (or you purchase it from someone). If you are unsure what name to use, try to stay meaningful to the overall blog’s broad topic.
There is also the domain’s extension to consider. The extension is the part at the end of the domain name, i.e. .com, .net, .io, etc. The choice is yours, but please note, every extension out there comes with different costs. The .io for example costs more then the .net, and then there are premium extensions like .ai that cost way more then the others. You can search for a new domain name at your favorite registrars website.
As a shameless plug, I want to mention that I own a company that sells domain names. You can search for your domain name here: Yog-IT - Domain names and hosting. I’m throwing in an offer for all you fine readers out there, right now you can take 15% off your first order of $25 or more using the coupon code SPECIAL15.
Once you’ve purchased your domain name, we want to tell the internet where to send traffic that requests it. All registrars have what is called DNS (Domain Name System) which is what we use to point the traffic to our blog. Every registrar’s DNS is different. I’ll use Yog-IT’s DNS as an example which is almost exactly the same as GoDaddy’s DNS administration.
We're going to start by adding the domain name to our blog. Browse back to your blog and login. Open the Admin Dashboard, then go into the Site Settings. Open the section named "Site URLs"
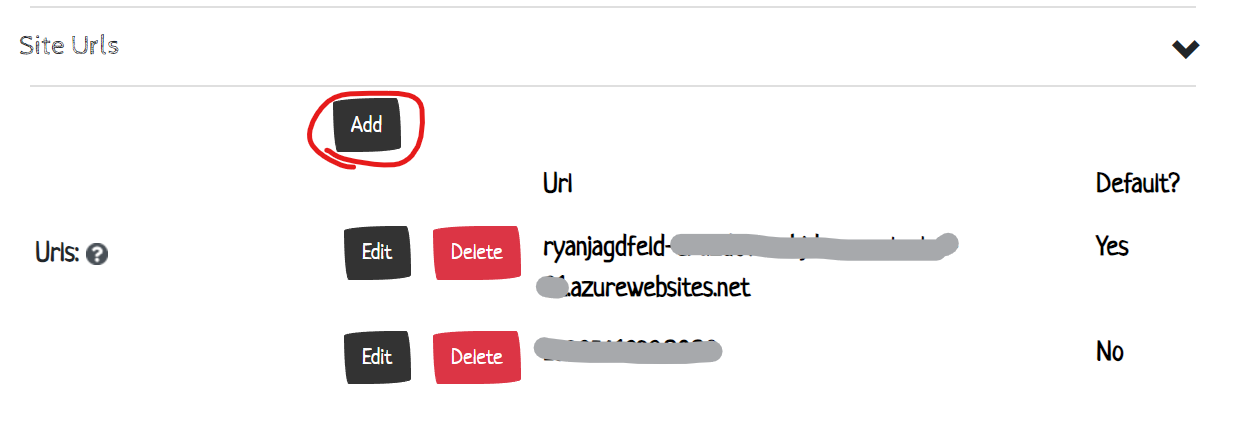
Click the Add option and enter your URL into the textbox, select "No" for it to be the default and then click save

It’s important to select "No" for the default here. If you select "Yes" it’s possible to make your site unreachable.
Our new blog web app received an IP address assigned to it by Azure when we created it. We need to now tie that new IP address to the domain name and validate it with Azure. Log into your Microsoft Azure portal and go to your new web app. Click on the Custom Domain option on the left menu.
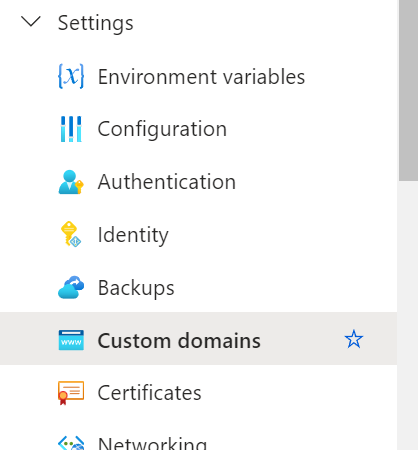
Click on the Add Custom Domain option at the top of the Overview

Select "All other domain name services" for the Domain name provider. Leave the selection for "App Service Managed Certificate for the TLS/SSL certificate and the selection for SNI SSL for the TLS/SSL type. This will give us a free SSL certificate to go along with our blog. Type the domain name you registered into the textbox provided and below your selection a couple of DNS records will appear that you need to enter into your domain's DNS.
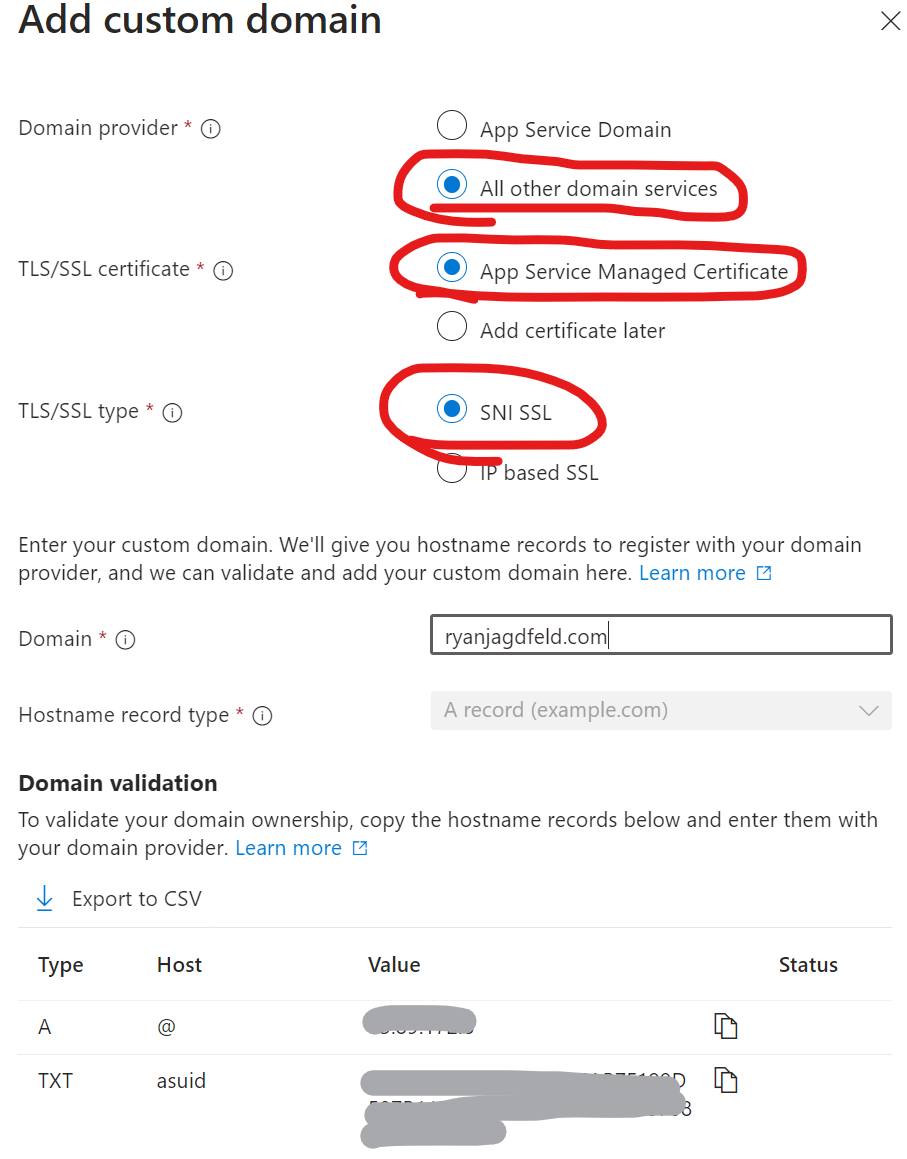
Update the DNS
Browse to your registrar’s DNS page for your domain name:
Locate the "A" record within the list of DNS records:
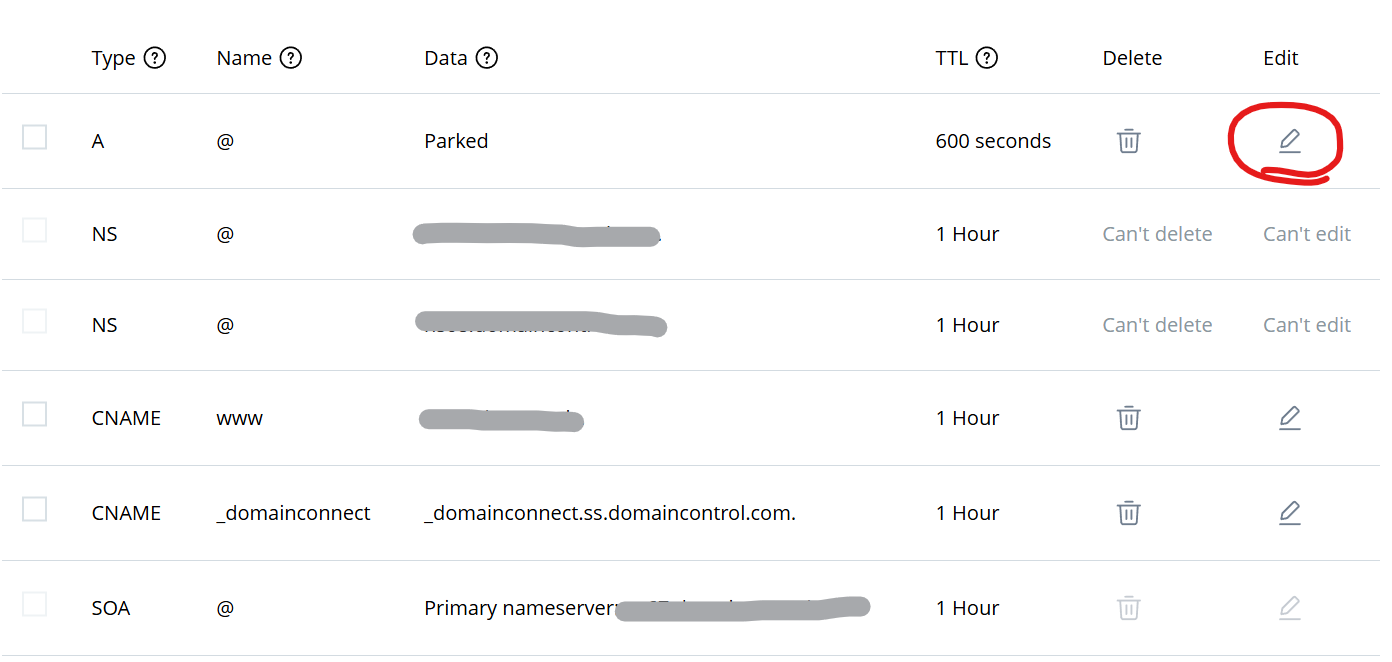
The A record is the primary IP address for your blog. It tells any device that is trying to reach your blog where it’s located by IP address. Click the edit pencil and enter your IP address into the Value textbox, set the TTL (Time To Live) to 30 minutes and click save

Find the option to Add a New Record
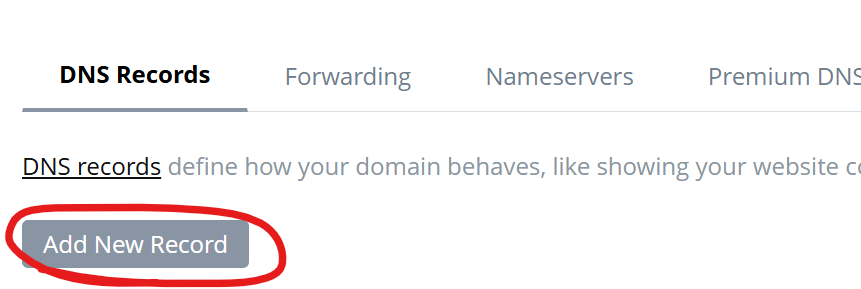
Select TXT for the record type, enter "asuid" for the host and copy and paste the long validation code from Azure into the Value box.

Go back to Azure and now you can click on the Validate button at the bottom of the Add Custom Domain pop out

After a moment, the domain will be validated. Click Add and you are now ready to switch the domain over in your blog. First, let's make sure the domain name is working correctly. Open a browser and type your new domain name into the address bar. You should be automatically redirected to your app, but with the Azure domain name given when you created it

If that all worked, login to your blog, go back to the Site Settings, Site URLs and edit the record of your new domain name and select "Yes" as the default

The page will refresh and you should automatically be back at your blog, but the address bar should now be your new domain name

NOTE: At this moment, there is a chance the DNS record update you made is not yet seen by your PC. This can happen because of caching. Just like the cache of your browser, DNS also caches domain name IP addresses. We set the TTL to 30 minutes, so if you receive a "not found" error of any kind, give it 30 minutes and try again, your local DNS should update in that timeframe.
Add META Data
META data is information we put into the <head> of a website to tell search engines and other bots about our new blog. In the data we can also set attributes that tell robots how to interact with our site and when to come back and review again. By default, Oqtane out of the box automatically adds some META data for the user's browser to display the screen in a specific way, the character set to use and if robots should review and collect information from the site:
<meta charset="utf-8">
<meta name="viewport" content="width=device-width, initial-scale=1.0">
<meta name="robots" content="INDEX, FOLLOW">
This is good information for the browser and the bots and rightfully supplied by the Blazor and Oqtane frameworks. We want to expand on this META data and add more to it. Log into your blog if you are not already, open the Admin Dashboard and browse to your Site Settings. Open the Site Content section. Here you will see two boxes, one for the Head Content and one for the Body Content. 
We will use the Head Content for this because all META tags should be contained within the <head> HTML tag and would be simply ignored if placed in the <body> tag.
We'll start with something to help bots know to come back on a regular basis. If you're like me, you have no release schedule for your blog, so I have no idea when I may post. For that reason, let's have the bots come back daily to review out blog posts:
<meta name="REVISIT-AFTER" content="1 DAYS" />
Let's tell the search engines that our content is for everyone and not just adult content or other types of restrictive content:
<meta name="RATING" content="GENERAL" />
And just a couple more to tell the search engine bots what our content is about and an image to display for when a link is created to our site:
<meta name="Description" Content="I've been designing and creating websites and apps for years. These posts are a collection of lessons, tips, tricks and knowledge I've picked up along the way.  I hope they help any weary traveler." />
<meta property="og:type" content="website">
<meta property="og:image" content="https://ryanjagdfeld.com/files/ryanjagdfeld-profile.jpg">
The Description is just what you think it is, a full description or overview of your blog. The I add two more tags in to help the search with tags that begin with "og" meaning Open Graph, social media's format for search engines, This tells the bots this is a website with the og:type META tag and where to find an image to use when a link is created to the site with the og:image tag. The image should be a web ready image format (e.g. .jpg, .png, .gif, etc.) and follow these size specifications.
Here is my entire META tag section now in my Head Content box in the Site Content section of the Site Settings. I add in a couple more tags to help out, you can checkout this page https://www.w3schools.com/tags/tag_meta.asp for more information and other META tags you can use, and more information on the Open Graph can be found here https://www.conductor.com/academy/open-graph/
<meta name="REVISIT-AFTER" content="1 DAYS" />
<meta name="RATING" content="GENERAL" />
<meta name="RESOURCE-TYPE" content="DOCUMENT" />
<meta content="text/javascript" http-equiv="Content-Script-Type" />
<meta content="text/css" http-equiv="Content-Style-Type" />
<meta name="Description" Content="I've been designing and creating websites and apps for years. These posts are a collection of lessons, tips, tricks and knowledge I've picked up along the way.  I hope they help any weary traveler." />
<meta property="og:type" content="website">
<meta property="og:image" content="https://ryanjagdfeld.com/files/ryanjagdfeld-profile.jpg">
Add Google Analytics
Next we are going to add in Google Analytics. This will help us track and analyze the traffic to our blog. Let's start at Google Analytics website. There are entire careers for working with Google Analytics, I'm going to go over the basics here to get you set up so your blog is recording the traffic. You can learn all about the basics of Google Analytics here: https://developers.google.com/analytics/learn/beginners.
First, you need to setup a Google Analytics account if you don't already have one and then the new GA4 property for our blog. Follow the directions given by Google here to set up a new Google Account, GA4 property and add a data stream for our blog: https://support.google.com/analytics/answer/9304153. When you get to the data stream step, click the Add Stream button and Google Analytics asks what type of data steam you are adding "iOS app, Android app, or Web" . Click Web, enter the domain name and give it a name. The name is just a reference for you to locate the stream, so it can be anything you'd like. Then click the Create Stream button.
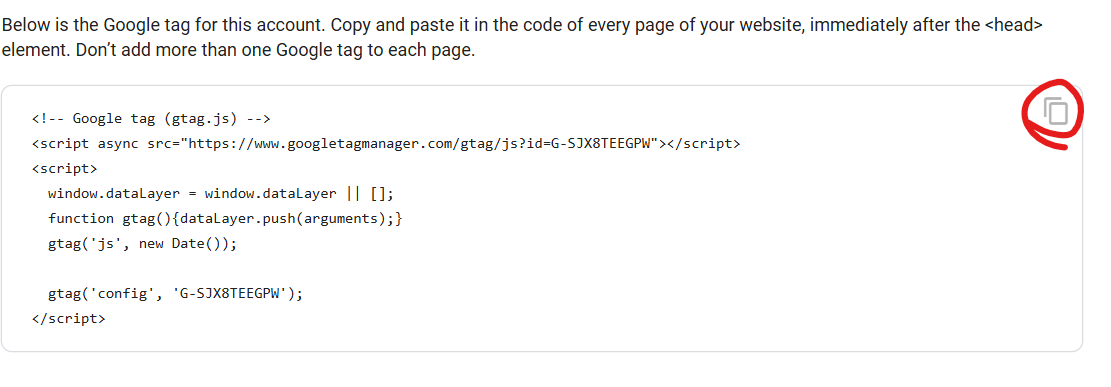
After the data stream is created, it's time to add it to our blog. We are going to be follow the direction here for Add the Google Tag Directly to Your Web Pages. For that, follow the directions to "View tag instructions" and select Manually Install from the top:

Then copy the code provided in the box
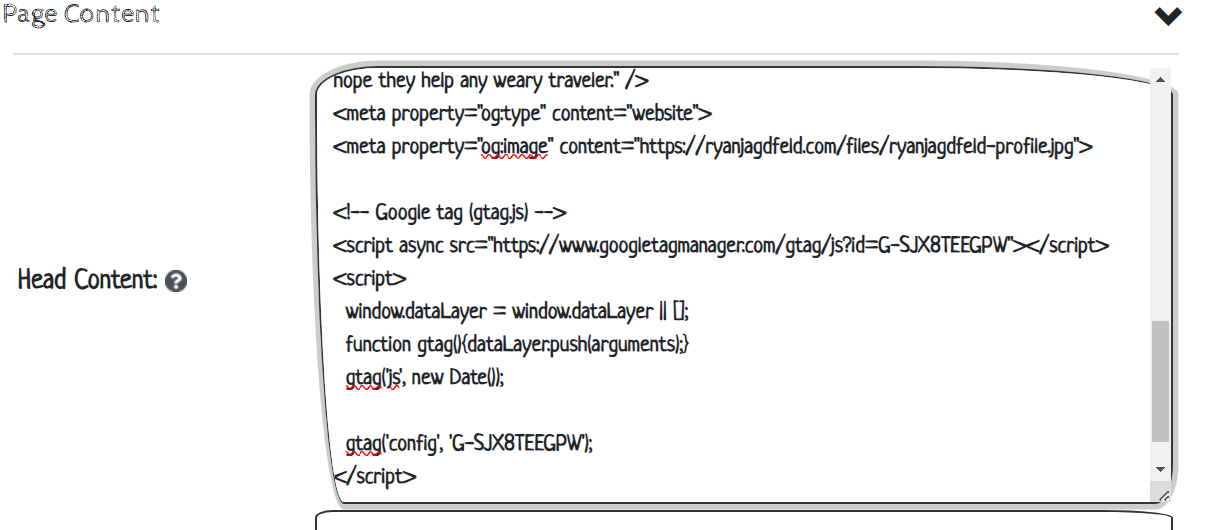
Now, we need to add this code to our site. Go back to the Page Content within the Site Settings. Click on the Admin Dashboard in your blog and click on Site Settings. Open the Page Content section and after the META tags you've entered, paste the Google Analytics code:
Go back to Google Analytics and click on the test

Conclusion
You've come a long way if you followed all the posts and steps for setting up a blog in Oqtane. I've gone over how to get your blog set up, working and out there on the internet. I'm so proud of you if this is your first time diving into these subjects. I would love to hear from you on your experiences with Oqtane and Microsoft Azure. Please leave a comment with any stories you'd like to tell, or any questions you may have about all of these awesome technologies. Thank you for following along!
Share Your Feedback...
Receive Blog Notifications...
© 2024 Ryan Jagdfeld All rights reserved.